
Sometimes when we want to fully become a character, we need to manipulate our facial features, decide between a mask, suit or body paint, add muscle tone, and hope we don’t break out the day of the big event. This week’s cosplay tutorials covers (pun intended) all of that. From cosmetically adding a 6-pack to what type of makeup works best for your entire body, you should be able to find the answers you’re looking for all in one spot, right here on Action A Go Go.
Makeup
Body Painting
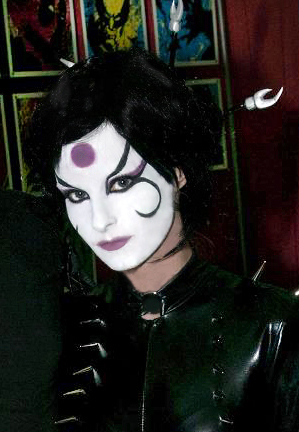
 Guess who? Dark elf , Hell Ball in Washington D.C., 2012. Snazaroo Classic Colors paint in Purple.
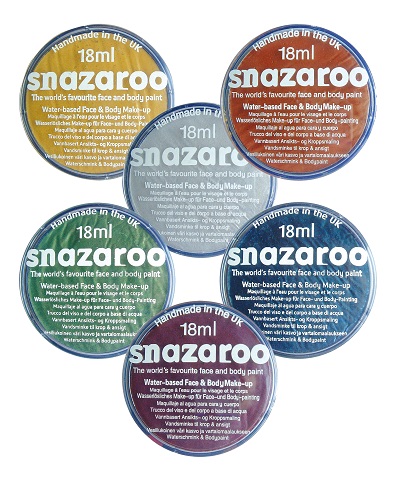
I always get asked what makeup I use for my costumes that require full body paint or full facial coverage. Snazaroo is my go to. One round, 18 ml disc is all you need to cover your entire body. I have tried the Snazaroo color sticks too, but they are not as easy to work with and I’ve noticed it doesn’t apply or dry the same way as the paint in the discs. Where the paint dries powder soft from the discs, the sticks seem more like grease paint. You can get either of these at Michaels Arts and Crafts stores (they usually have a 40% off coupon out). For a broader range of colors, search online. The ones I use stay on for hours, feels soft on your skin, doesn’t flake and can look like airbrush paint if you use it right. Best of all, when you’re ready to wash it off, it comes off nice and easy with soap and water.
Most paints like this say to use a makeup sponge, but I actually find it much better to use my hands. Not only does this way offer more coverage faster, I have found it provides more of an even application if done right.
You’ll need to place newspaper or something you don’t mind getting dirty under the disc of paint. You’ll also need something to stand on that you don’t mind getting paint on either unless you’re applying it in the shower.
You’ll want to be clean and dry for the best result. If you have dry skin, use a very light, non-greasy moisturizer at least an hour before applying the makeup. I start by wetting the fingertips of one hand and then going straight into the disc, swirling my hand around to wet the paint. At this point you’ll have enough paint on your hand to start with. So now, you’ll apply it like you’re rubbing lotion onto your skin in an up and down motion, moving around whatever body part you start with.
If it is not opaque enough, repeat the process immediately, as once the paint dries, it’s really hard not to get streaks and you could end up removing some of the dried paint. Make sure the paint isn’t dripping wet. You want it to be just wet enough for a fairly opaque spread. If it is running down your body, it is too wet. Wipe dripping paint immediately as it is not easy to go over evenly once dry.
The best approach is to cover the entire area of a section one by one before moving on. For example, if you are starting with your arm, start at your shoulder down to your elbow and finish before moving onto your elbow to your wrist. So just think of your elbows, knees and ankles as the lines to stop and start. This is so if you go too far and don’t get back to it in time, you don’t end up with streaks. I would advise against a willy-nilly application like doing the top half of your arm and then starting your thigh. I always save my face and hands for last.
Once you are done applying everywhere you want, you want to let the paint air dry for at least 20 minutes before putting on your costume or sitting down. This paint does transfer, but it is washable and whatever transfers doesn’t leave a complete bald spot on your body.
Face Painting
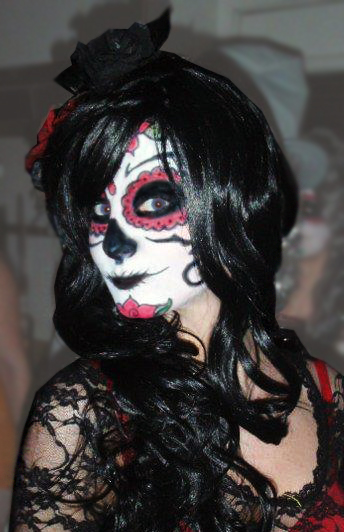 Dia de Los Muertos sugar skull. Snazaroo Classic Colors in White, Black and Bright Red.
For face painting, I use the same paint as mentioned before, Snazaroo. Not the variety pack of small circular paints used for face painting, but the larger, 18 ml single discs as mentioned before. This is usually only for the base unless I have the colors I need for everything else in those discs already. For example, If I want to paint on a white mask, I use the paint from the large disc for this. For the small details, the variety pack is suitable, however I’ve noticed a difference between this and the single discs. The paint from the variety pack seems to “melt” off easier and smudge. I can sweat a bit in the paint that comes from the discs and still have my paint stay put (as long as I don’t rub it away). So that is why I choose to use my regular makeup for the smaller details, instead of the variety pack unless that is all I have on hand. So say I need black outlines or details, I use my eyeliner which is waterproof. Liquid or pencil works well here. For softer colors like rosy cheeks, I stick to my own blush swirled or brushed over the face paint lightly with a blush brush, or I press a fingertip into the cream based variety pack or disc and dab a few dots onto my cheeks and use the clean fingers to blend away by dabbing over it in a circular motion. Whatever I use on my lips though, I always bring chap stick with me to re-moisten my lips and rejuvenate the color. Makeup not designed for lips in particular is very drying.
You want to make sure your face is clean and dry before applying the base. Use a moisturizer if you have dry skin because Snazaroo paint (large disc) dries like powder and you will see the dryness underneath. For this, I like to use Olay Age-Defying 2 in 1 Anti-Wrinkle Day Cream + Serum. This stuff absorbs really fast and is not greasy. I apply the moisturizer only when needed and at least 15 minutes before applying my makeup. I apply the base the same way I do when applying it to my body only with two hands instead of one. This can get messy so be sure to have something underneath the paint disc that will catch any paint excess.
Wet fingertips of one hand, swirl wet fingertips in the disc of paint, rub painted fingertips together with your other hand and apply like you’re applying lotion. You can apply this to your eyelids, but not too close to the lash line. This does burn if you get it in your eyes. So naturally, the same applies to the lower lid. If the color needs to be applied all the way to the lash line, opt for a makeup pencil in the same shade, or use a makeup brush to carefully apply the paint to those areas. If your character has makeup around his or her eyes that is different from the base, skip applying the base to those areas.
 Scarab from David Mack’s “Kabuki”. Baltimore Comic Con 2012. Snazaroo Classic Colors Paint in White and Black. The rest of the makeup was done with eye shadow.
For a character mask like the one I did here for Scarab from Kabuki, you want to make sure you don’t go past the natural line of your face. So I imagine a real, full face mask’s perimeters and stay inside those lines. You can draw a line using a makeup pencil in the same color of your mask, or dip a small angled paint/makeup brush into the paint you’re using. So generally, I don’t blend into my hairline, but I’ll go as high up as I can. For the lower part, I go just past the line from my ears, jaw and chin.
To have your face paint meet the line of your costume, simply blend down several inches past the point that will be showing. Do this without clothing touching that area. To apply patterns and to meet a cowl, you want to use makeup or soft paint brushes. Go an inch or two past where the cowl will meet the paint, then apply the cowl. Always apply lighter colors first, then finish with your darker colors.
 I’m applying makeup to Robert Legaspi for a heroes vs. villains “action” inspired photo shoot at the National Mall in 2013. Snazaroo Classic Colors paint stick variety pack.
For the finer details, use the appropriate brushes for what you want to create. For straight lines, use a flat edged or angled brush. For dots, use a brush with a pointed tip. For lining your eyes use an angled brush.
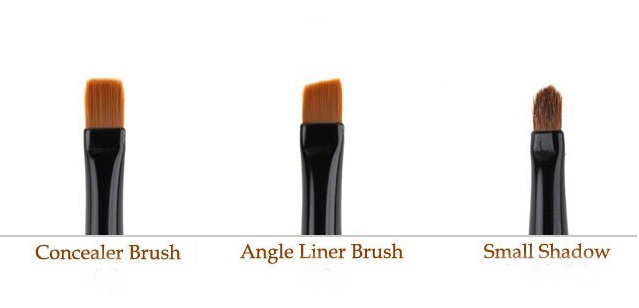
You can use powder or cream makeup over the Snazaroo base paint. Always set your details and eye makeup with either a translucent loose powder, or matching powder eye shadow. You’ll want to use a thinner brush than what you used for the details just to be sure you don’t out of the detail lines. Remember to tap (don’t blow) off excess powder. You’d hate to do all that work just to get shadow dust on your paint and smudge it all over the place. This is hard to fix! So if you don’t want to take any risks, you don’t have to set the makeup at all. However, if you do get some shadow flecks on your paint, that’s what this brush is for;
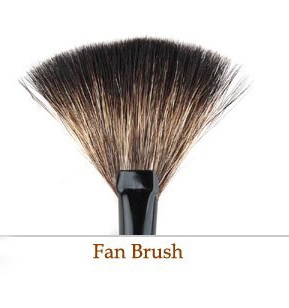 Ever wonder what this brush was used for? Now you know.
With the tip of this brush barely touching your face, see if you can lift the dust just by lightly touching the residue. If it remains, ever so gently swipe if off. Never press it into your face where the bristles are flush with your skin.
Leave the base alone (no loose powder here) as this can dry out the paint too much or distort the color. Again, Snazaroo paint (disc) dries like powder so this is not necessary.
Tattoos
So your character has tattoos? Here’s a good way to tackle that without turning to permanent markers, or smudgy makeup.
All you need is tracing paper, a pencil, tape, scissors, a wash cloth, baby powder, a powder or blush brush and liquid eyeliner. You may also need a helper to apply it if the tattoo is in a hard to reach area.
You’ll want to first draw the tattoo on tracing paper the opposite direction it is on your character. Drawing it the way you see it will reverse the image on your skin. You may get lucky and find the tattoo by searching online. You can then print it out, flip it over and trace it onto the tracing paper. This also helps if you are not an artist!
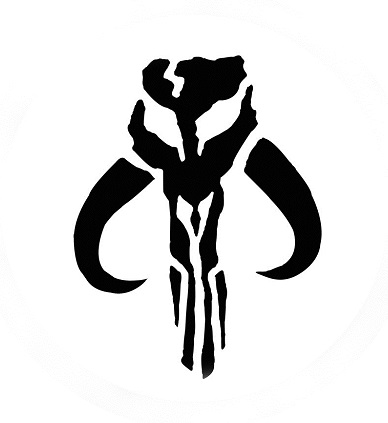
If your design is small, cut a square around it so you don’t fumble with a big piece of paper on your skin. Next, tape the square with your design on it to clean, dry skin (no lotion), sketch side down. With a wet washcloth, press and hold over the paper for about 30 seconds. Remove the paper and you should have a light transfer of your drawing.
Now go over you’re the transfer with the liquid eyeliner. Once you are finished, sprinkle baby powder over top to set it, and dust off with powder/blush brush. If you are cosplaying the same character the next day and don’t want to do this over again, there’s a solution for this as well. Only one additional step is required here and that is to apply a layer of liquid bandage just over top of the tattoo after the baby powder. You can get this stuff at any pharmacy (it looks like a bottle of clear nail polish).
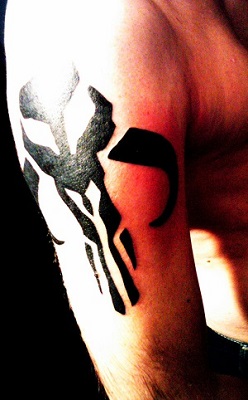
Fortunately, most tattooed fictional characters have black tattoos. If your character happens to have color in theirs, you’ll need additional colored markers for this. You can get temporary tattoo markers as low as $5.00 online and that usually includes a few colors. Before outlining the transfer, fill in your design with the necessary colors. Now outline the tattoo with the liquid eyeliner and set with powder.
Muscle Tone
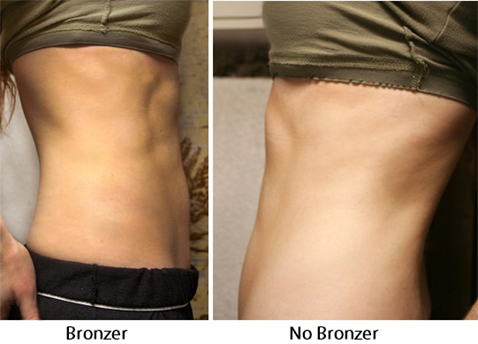
You’ve decided to dawn a costume that shows off those muscles, only problem is, you don’t have the muscles. Have no fear, makeup is here! Once again, makeup comes through for us to solve our cosplay woes. Or perhaps you’re like me, you are toned so you know it’s there, but you are so pale, no one else knows it’s there. This next tutorial is going to show you how to get those muscles to show up using 2 products; powder bronzer (packed or loose) and a medium/large blending brush. You want to get a matte bronzer or as little shimmer as possible. Too much sparkle will draw attention to the fact that you only have sparkles on your muscle lines. Hmmm….
The only exception to this is if you are bronzing the whole area first, which I will get to after this.
I will be showing you abs specifically for this tutorial. With this, you should get the idea of how to attain other muscles on your body. You may need a helping hand to get other areas of your bod. Some muscles are harder to create than others. This you can do all by yourself, no working out required.

Step 1. You want to start this in your birthday suit or bare minimum around the area you’ll be working on. Although I said no working out is required, this is for those that have tone and just want to get it to show up more. Do about 20 crunches just to get that definition to show through a bit. If you want to skip this step, grab a reference picture of the character you will be cosplaying.
Step 2. I like to apply lotion to the area where my muscles will be so that the bronzer has something to stick to. If you have sunscreen that has a slight shimmer to it, use that, otherwise any lotion is fine. This is optional of course, so if you’d rather just get to it, get your bronzer ready.
Step 3. Swirl your blending brush into the bronzer, tap off excess and follow the natural line of the muscles you want to show up. You want to apply the makeup where the shadows are otherwise you will be creating dimension that is unnatural. So lightly swipe along the line to gauge how much lighter or darker you want to go. If it is too dark, grab clean blending/powder/blush brush and stroke the line.
If you are starting from scratch, apply the bronzer where the muscles are on your reference photo. Depending on your character, natural or obviously fake is okay! The darker you go, the more cartoonish your muscles will look.
That is it! Easy huh?
Now, there is a reason why body builders douse themselves in bronzing oils, lotions, etc. It’s not just to look like a bronze statue. It’s because the darker your skin is, the more lean you look and the more visible your muscles are. So if you plan on bronzing yourself for the character, do that first. Now you can use a shimmery bronzing powder to create that muscle mass. Here is a comparison of bronzing vs. non bronzing.
Cover Ups
Eyebrows
There are a number of characters whose eyebrows are completely unnatural or just not there at all. The Queen of Hearts from Tim Burton’s Alice in Wonderland, Maleficent, Cruella DeVille, Jessica Rabbit, Edward Scissor Hands to name a few. In order to make these characters legit, we need those brows or lack thereof. So we’ll need to get rid of our own and not everyone wants to shave them off. Well you don’t have to! You can easily cover them up with a glue stick and some makeup. So let’s get started shall we?
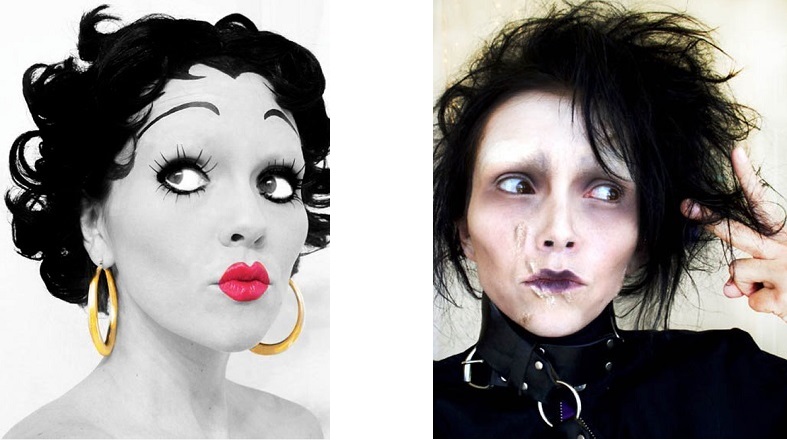 The talented Kandee Johnson
Grab an Elmer’s glue stick (or any water soluble, non-toxic glue stick) from just about any store. Purple or white does not matter. Clean off your eyebrows with rubbing alcohol to remove any oils from your brows and let them dry.
Brush your eyebrows down with an eyebrow brush or a toothbrush if you don’t have one. Apply the glue in the same direction as your eyebrows, downward. After they have been covered completely, brush them back to their normal direction and apply glue following the brows.
Flatten your brows down with you finger by rubbing it in the same direction. Let dry. If you have dark eyebrows, you’ll want to pat some tinted loose powder over top of the glue with a makeup sponge or puff before the glue dries, then, let it dry. Repeat 1-2 more times letting each coat dry before re-coating. Next, you want to scrape a bit of the glue from the glue stick with a makeup spatula or any flat edged utensil and spread it across your eyebrow in the same direction of the hair. This will be thick. Make sure it is smoothed down, not lumpy. If you applied too much, wipe away with a moist Q-tip. Now dust with a translucent loose powder and a puff. Dust away excess powder with a powder brush. You’ll want to cover the eyebrow with light or white colored cream-based concealer by stippling it with an eye shadow or blush brush. This should be opaque and it is okay to have it go outside of the eyebrow because this will be blended. Go over top of the concealer with a full coverage foundation that is closer to your skin color by stippling it on the same way. Set with translucent loose powder and a puff, brushing off excess with a powder brush. Now your face is ready for paint and the eyebrows you need.
Tattoos (again)
Do you really want to cover up that tattoo for the sake of cosplay? Yes? Then you are dedicated. There are plenty of products on the market labeled as “tattoo concealing makeup”, but I have yet to see one that actually covers up a tattoo by itself. SKIP IT. You’ll only have to go out and buy more supplies to cover it up. It takes patience and layers to cover up a tattoo and here’s how to do it.
What I use is a primer for my skin, blemish corrector /concealer (green stick), light concealer, light liquid or cream foundation, translucent loose powder, a powder or blush brush and white Snazaroo face paint in the 18ml disc. Wow! Is all this really necessary? Probably not, so here’s what you’ll probably only really need;
A liquid or cream foundation lighter than your skin tone (about 1 shade), translucent loose powder, a powder or blush brush and an opaque/full coverage makeup such as Snazaroo (regular makeup is not opaque enough), that is much lighter than your skin tone.
This in essence will cost the same or less than “tattoo concealer”, but it will actually work. Take a look for yourself.
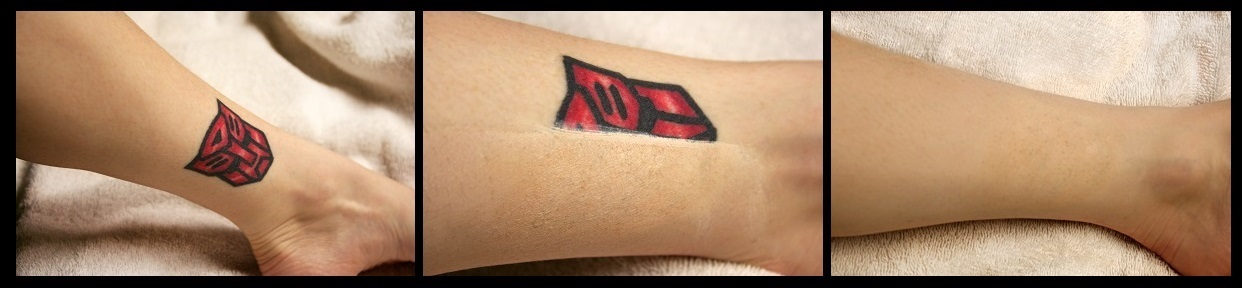
As you can see, it’s not perfect, but with a bit more time and patience, it could be darn close. I did this quickly just so I could show you the coverage. This result took about 10 minutes. Five more minutes and it could have been even better. I do not have hair where my tattoos are, so if you have a lot of hair, you will want to shave it as I am not sure this will have the same effect with hair in the way.
Here is the step by step process including everything I used:
- If you have a primer, go ahead and prime the entire tattoo. If you don’t have primer, use your opaque makeup (Snazaroo) to cover the whole tattoo by wetting your finger just a bit, rubbing in the paint and dabbing it on with your finger. It is okay to go outside the tattoo. This should not be runny or as wet as the face and body paint tutorial.
- I used my green concealer stick next because my tattoo is primarily red and this concealer neutralizes red. If you are using the green concealer, try not to go outside the tattoo. I do not think the green concealer is necessary, so now you will go over the opaque makeup with the loose powder with a powder puff. By no means ever do you want to rub the makeup in. This will not cover up your tattoo but instead get splotchy. Dust off excess powder with powder/blush brush.
- This is where I used my regular concealer by dabbing all over with my finger, but again, don’t think it’s necessary. If you are using concealer, let it dry for about 2 minutes before moving on. So now you want to get a tiny amount of foundation, about the size of a sunflower seed on one finger, then a good amount of opaque paint onto a finger from your other hand. Rub them together to create a slightly tinted cream. Dab it on covering the whole tattoo and around the tattoo. You should see now how much of each you’ll need to start getting it to match your skin color.
- Pat with loose powder again. Dust off excess with brush. After I used my regular concealer, I followed with steps 1-3 omitting the first sentence from each step. Now we’re caught up if you are doing it exactly the way I did.
- Repeat step 3 (if you used concealer, start there.) This time adjust the amounts of foundation and paint to better match your skin tone. Dab it on over the tattoo and around the tattoo. Start to blend away the makeup outside the tattoo.
- Repeat step 4.
- Repeat step 3 if necessary (minus the concealer now if you’re using concealer)
- Repeat step 4 if you did step 3.
You may want to do steps 3 & 4 one more time. Always end with loose powder to set the makeup. The more times you repeat the process, the cakier it will become, so don’t do it too much and always remember to dab the tattoo and blend away the outside area.
The foundation I use costs about $10 (Revlon Photo Ready) the translucent loose powder is N.Y.C. brand found at CVS and Walmart for about $3.00, a powder/blush brush varies, but you can get a decent cheap one for about $4.00 anywhere that sells makeup and the Snazaroo paint is about $5.40 with a 40% off coupon from Michaels. That’s about $22.00. Makeup that is designated as “tattoo concealer” ranges from $10 – $35.00. So it’s in between and as you can see, it works.
The Worst Timing, Sleeper Pimple
Cosplayers, you know this pimple well. The one that stays away all year until the day of your epic cosplay. This guy welcomes the world right in the middle of your forehead or the tip of your nose. For those that have chosen to wear a full suit of armor, lucky you. For everyone else, it’s game over.
Or is it?
While no one likes pimples, blemishes, zits, etc., it’s especially unwelcome when we have events to attend. While this is commonly due to stress for cosplayers, it’s not the end of the world. Remember first thing is first, perfect skin is rare, so more than likely, you won’t be the only one with a blemish here or there. Secondly, if you happen to catch it the night before your big day, put some honey on it and cover it with a band-aid. Who brings honey and band-aids with them? Probably no one, but for occasions like this, it can save your skin the next day. Nothing works on a pimple the way honey does. That is, 100% pure honey. I have gotten into the habit of taking apple cider vinegar with me now too. It works as natural toner and is good for your skin. I follow it up by applying honey to any red bumps and cover it with a band-aid over night. Even though I sometimes look like I got into a literal cat fight with all the band-aids on my face, by the next day I get the last laugh. While not completely gone, the blemishes and pimples are way less prominent and red. So FYI for anyone planning a big day or weekend event, fill a travel sized bottle with apple cider vinegar, fill another with honey, grab some band aids and take this stuff with you!
Now if it is the day of and you just discovered this bad boy, it’s time to turn elsewhere. In this case, makeup and Visine (yes the eye drops.) A lot of times these things are dry and bumpy, so no matter how much makeup you put on, you’ll still see the bump and worse, the dried skin. This is when Visine comes in handy because it takes out a lot of the redness from the pimple. It only lasts a couple of hours so apply Visine with a cotton swab or your finger tip just before you are ready to apply your makeup.
You’ll need the green face primer if you have splotchy skin, otherwise a regular primer. A green concealer stick just for the red bumps if you’re not using the green primer. Your regular concealer, your normal foundation or whatever face paint you’re using, a small makeup or paint brush with pointed (not flat) bristles, a Q-tip, a powder or blush brush and translucent loose powder. This is for you if you have a few spots that need covering up.
Start with clean hands and a clean face. Apply the Visine. If your face is dry, use a light, non – greasy moisturizer after the Visine. Wait a few minutes for the moisturizer to absorb a bit before applying the rest of your makeup.
Now apply your primer. Next, with the small makeup brush, dab the green concealer stick and apply only to red spots by dabbing it on. To avoid spreading the acne bacteria, use a similar clean brush if you have one, otherwise use a Q-tip to apply the regular concealer by stippling over the green concealer. Blend out past the red spots. With your finger, press a little bit of loose powder over the concealed spots and dab it in. Brush off any excess powder gently with the blush/powder brush. Now apply your foundation or face paint. If using foundation, dab it on with a thick foundation brush. Gently dab over the concealed spots careful not to scrape the concealer off. Finish by patting loose powder over foundation, gently brushing away excess powder with blush/ powder brush (skip this if you’re using face paint).
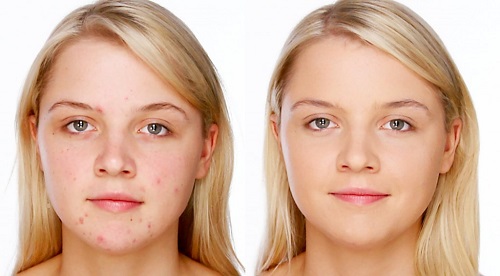
If your face looks more like the following picture on a regular basis, heavier redness, several patches of bumps, here are some tips on how to take care of that from gossmakeupartist.
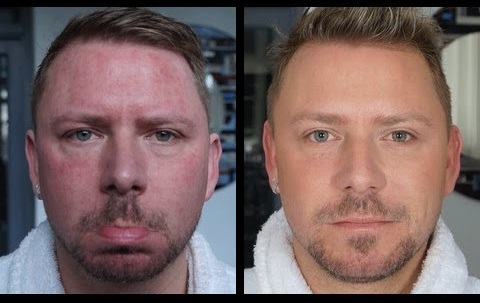
As a former beauty specialist & makeup artist for Victoria’s Secret, I can tell you that men are no exception to bad skin. Nor are they an exception to being self-conscious about acne, scars, etc. As mentioned in the tutorial by gossmakeupartist, guys, it’s not a big deal if you need to cover up these things with makeup from time to time. It doesn’t have to be fussy or time consuming. I have covered up spots, scars and bruises for men inside and outside of Victoria’s Secret. Construction workers, models, business men, I have helped all sorts. While some were understandably a bit embarrassed to ask a makeup artist for help, some were quite brave. You have to remember that even though makeup is directed towards women, it’s because women are more prone to making it a part of their daily routine. So commercially, that’s just business. However, everyone on film, plenty of musicians and tons of other performers are wearing makeup. That’s a lot of women and men in makeup. So guys, you are not the first and you won’t be the last. Don’t be afraid to grab that concealer. The clerk behind the counter is going to think it’s for your girlfriend anyway.
That completes this week’s cosplay tutorial. Hope this helps you all out and answers some of those questions you’ve been pondering. Join us the next few weeks for more on cosplay. If you have any cosplay questions, ask in the comments below. Maybe your question will be featured in an upcoming tutorial!
Tabatha LeStrange
Often times referred to as Optimus Prime, Tabatha LeStrange is a machine. A ghost machine.
Catch her if you can on Twitter @BD_Danger
The views and commentaries expressed on these pages are solely those of their authors and are not necessarily either shared or endorsed by ActionAGoGo.com.
all copyrights held by their respective owner(s)