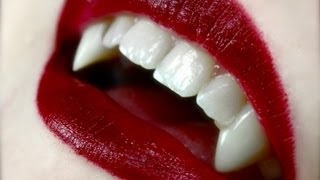
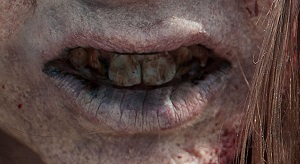
Welcome to AAGG’s week two of cosplay tutorials. Last week we explored how to make a breast plate out of craft foam. This week, it’s all about the teeth.
Want to know how to get those teeth to match your cosplay without having to turn to the cheap, bulky, plastic (lack of) variety from the party store? Make your own! With a few simple tools, you can create the teeth you want at a low cost.
Let’s start with good ol’ fashion vampire fangs.

I vaaant to suuuck your blooood
With just a couple of false nails and some denture glue, you can make legit vampire fangs.
What you’ll need:
1. A pack of false nails. (The long, uncut white ones, not the french manicure kind)
2. A tube of denture glue, like Fixodent or Polygrip.
3. Nail clippers
3. A nail file
All of these items can be found in most retail stores.
Directions
1. Decide what set of teeth you want the fangs on, the incisors next to the two front teeth, or the cuspids (canines).
2. Choose what set of false nails best fit the two teeth they will be going over.
3. Using the nail file, file the tops (wider end) to a semi-rounded shape to follow the arch of the top part of your natural tooth.
4. Using the nail clippers, trip the false nail to the desired length of the fang you want.
5. File down the lower sides of the false nail at an angle to create a point.
* Do not make the tip too pointy or you could hurt yourself.*
6. Wipe one of the teeth you’ve chosen for the fangs completely dry with a napkin or paper towel.
7. Keeping your lips off your teeth, squeeze a pea size or less of denture glue onto the back of the false nail and apply it to your tooth. Press in place for 20 seconds. Dab off any excess glue with a cue tip. There may be some glue behind the nail on the bottom as well, dab off with cue tip. This glue will taste odd.
8. Repeat steps 6 and 7.
All done! You should be able to talk, maybe with just a little lisp. You should also be able to close your mouth (depending on how short you cut the fangs).
For a visual tutorial, oxlisalouxo has one on Youtube. See it here.
Before we go on to the next tutorial, isn’t the thought of retractable vampire teeth cool? Well it’s not just a thought anymore. I know we’re talking about creating your own set of teeth, but check out this short video of these bad boys.
How neat is this!? You can buy these fangs by doing a quick online search. By putting the back ends of the mouth piece in boiling/hot water, the ends soften so that you can bite down on them with your back teeth and the piece will take their form. How the retraction works is by using your tongue on the tongue bar that sits across the mouth piece. The downside to these though, is that it’s sort of clunky and it’s hard to talk with them in.
Now we’ll explore zombie teeth.
How many zombie walks have you gone on without the teeth to match? Come on guys, it’s time to step up your zombie game. In the video below, Kiana Jones shows us just how to get these teeth down by using tooth enamels. In this video, you’ll also see how to black out a tooth and make scary sharp teeth. Rock on!
Last set of teeth we’ll take a look at today are demon teeth.
As you can probably imagine by the picture, you can achieve this look by using any of the methods seen in the previous two tutorials. You can use false nails by following the steps in the first tutorial. Only this time, repeating several times instead of just two. I would also advise to go shorter and shorter with the false nails on each subsequent set of teeth after the two front incisors. This will make it easier to close your mouth, but it’s your choice what you do of course.
In the second tutorial, Kiana shows us how to make this look by using tooth enamel in her video. This way will be best if you’re not looking for perfectly even chompers. You can get as crazy as you want by making broken teeth, cracked teeth and jagged teeth along with these sharpies.
I have one more method you can try to get these scary teeth. I have tried this one myself and it does work. Much like the way Kiana uses tooth enamel to create her pointy teeth, we’ll be using liquid eyeliner instead.
What you’ll need:
1. WATERPROOF liquid eyeliner.
Directions
1. Dry your top or bottom row of teeth with a paper towel or napkin. (Do one set completely first, then the other if doing both top and bottom. )
2. Keeping your lips off your teeth, shake up the eyeliner and create points by coloring both bottom edges of your teeth at an inward angle. Dip the brush back into the liquid and repeat on as many teeth as you want. Do not close your mouth at any point while doing this. Doing so will disturb the eyeliner. Let the liner completely dry before closing your mouth. You may have to go over some areas as the liner may still come off after drying.
While this method works, it may not be the best. However, liquid eyeliner is highly accessible and may be worth experimenting with. I have not gone several hours with the liner on my teeth, but I have seen some people go this route who have and it has worked wonders.
This completes the tutorial for getting the teeth for your cosplay. Good luck!
Join us the next few weeks for more on cosplay. If you have any cosplay questions, ask in the comments below. Maybe your question will be featured in an upcoming tutorial!
Tabatha LeStrange
Often times referred to as Optimus Prime, Tabatha LeStrange is a machine. A ghost machine.
Catch her if you can on Twitter @BD_Danger
The views and commentaries expressed on these pages are solely those of their authors and are not necessarily either shared or endorsed by ActionAGoGo.com.
all copyrights held by their respective owner(s)


